Compliance Policies
- 01 May 2024
- 4 Minutes to read
- PDF
Compliance Policies
- Updated on 01 May 2024
- 4 Minutes to read
- PDF
Article Summary
Share feedback
Thanks for sharing your feedback!
Compliance Policies enable you to identify API endpoints that violate your organization’s security policies. You can use these compliance policies to identify violations apart from the standard vulnerabilities that Traceable identifies. Traceable provides you with certain pre-created policies that you can use to identify violations. However, you can also define custom policies to identify these violations based on various attributes, such as the environment the API is present in, its vulnerability type, and data sensitivity. You can also enable or disable these policies according to your requirement.
.png)
The compliance policies are separated into the following categories:
Traceable — This category lists the compliance policies that Traceable creates by default. These policies help identify some of the most common violations that occur across API endpoints. For more information on these policies, see Traceable and PCI DSS Compliance Policies.
PCI DSS — This category lists the compliance policies that Traceable creates to identify PCI DSS data across API endpoints. For more information on these policies, see Traceable and PCI DSS Compliance Policies.
Custom — This category lists the compliance policies that you create using various attributes according to your requirements. For information on these policies, see Custom Policies.
You can access the Compliance Policies page through API Catalog → Settings → Compliance Policies. While the compliance policies page lists the policies, the identified violations are listed in API Catalog → Issues. On this page, you can view the details about the violations and the API endpoints in which they were identified. For more information on how to navigate through these violations, see Issues.
Note
The compliance policies only help in identifying violations across discovered API endpoints. Based on the details about these violations, you can also choose to create custom policies under API Protection. These policies help protect your APIs according to the settings you configure. For more information on how to create these policies, see Custom policy.
Traceable and PCI DSS Compliance Policies
Traceable creates some policies by default and lists them on the Compliance Policies page. On this page, under the Traceable and PCI DSS tabs, you can hover over the File () icon corresponding to policies’ names to view their descriptions.

Traceable recommends enabling these policies to help identify some of the most common violations and PCI DSS data across API endpoints. Each policy has a SEVERITY associated with it, based on which you can enable or disable it according to your requirements. To do so, click on the toggle under the STATUS column corresponding to the policy you want to enable or disable.
Traceable also allows you to filter policies to view the ones you want:
Severity — This lists the policies based on the severity Traceable has assigned to them.
Status — This lists the policies based on whether they are enabled or disabled.
Custom Policies
You can create your own custom policies by selecting various attributes according to your requirements. Traceable uses these policies, identifies their corresponding violations, and lists them on the Issues page for you to take action.
To create a custom policy, complete the following steps:
Log in to the Traceable platform and navigate to API Catalog → Compliance Policies.
On the page’s top right corner, click on + Custom Policy.
In the Name step, complete the following:
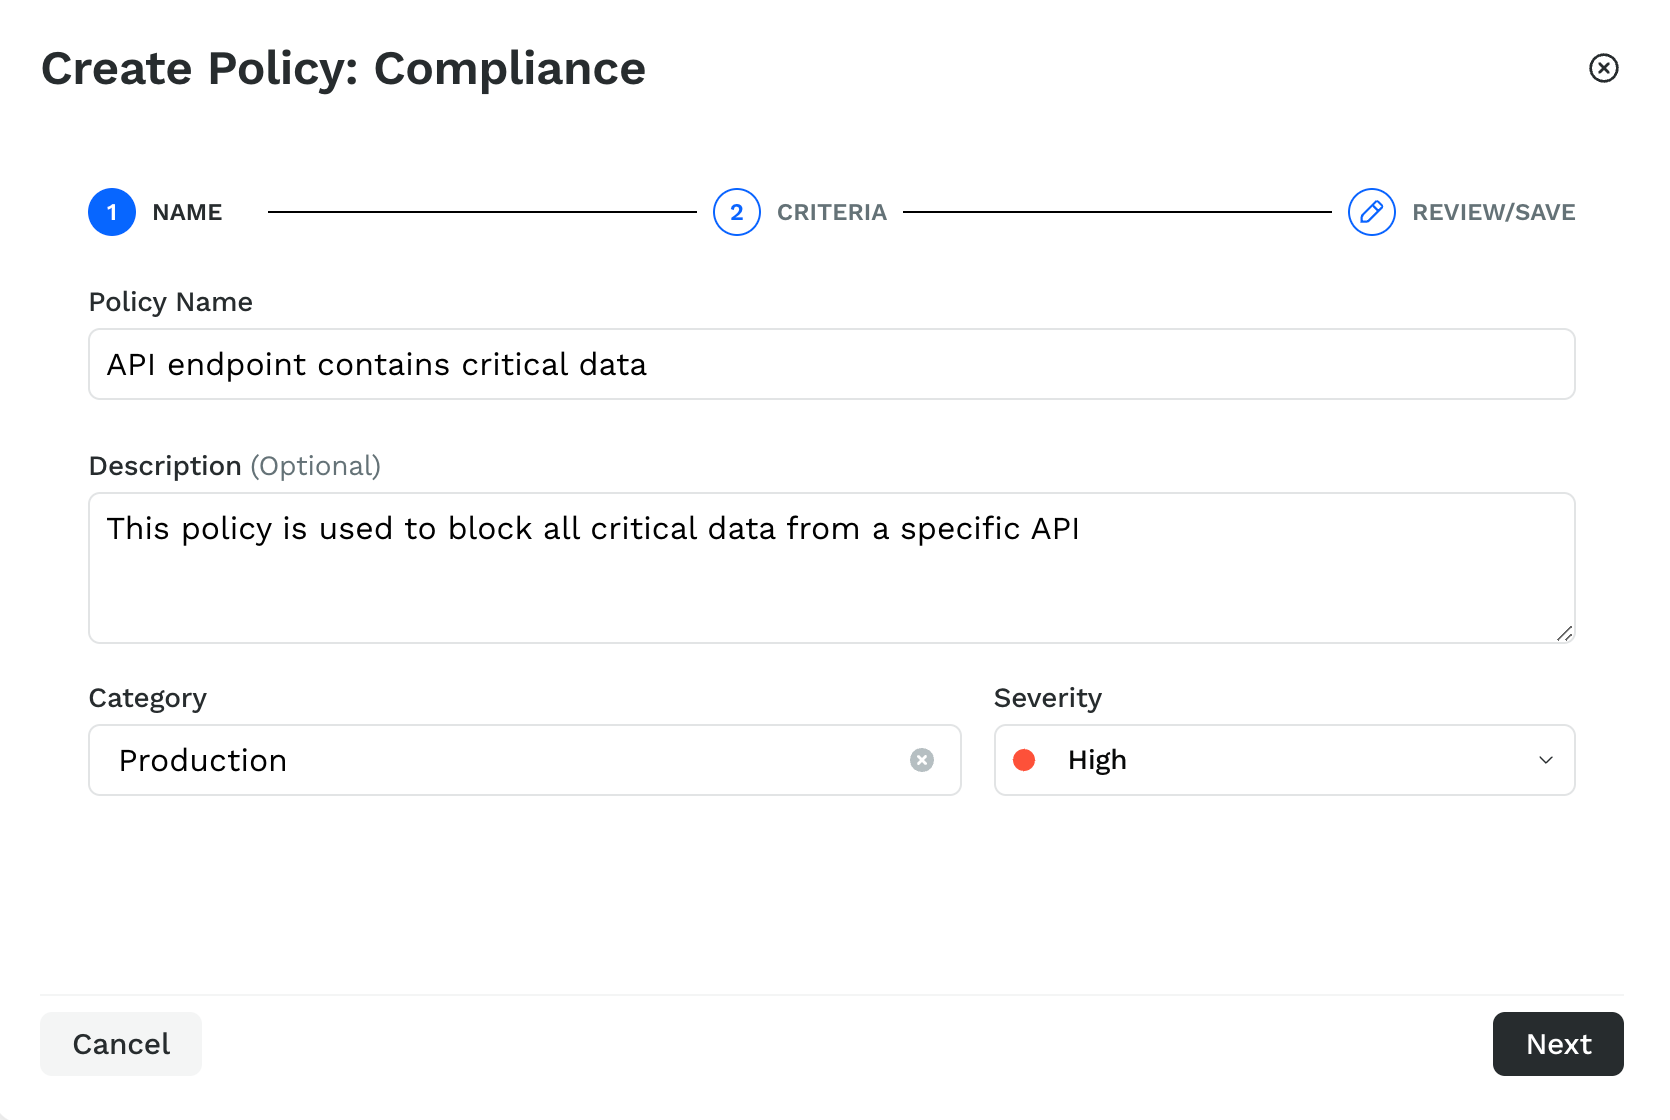
Specify the Policy Name. For example, API endpoint contains critical data.
Traceable uses this policy name as the Issue Name on the Issues page.(Optional) Specify a Description for the policy.
From the Category drop-down list, select the category to which the detected violation should belong or specify a category name and click on Create new Category “<Category Name>”. For example, Production.
Select the severity from the Severity drop-down list to assign to the policy, for example, High.
Click on Next.
In the Criteria step, complete the following:

From the Environment drop-down list, select the environment on which you want to check the violations. By default, Traceable selects All Environments.
In the API Attribute section, click on API Attribute + and select the attribute according to your requirements. For example, Endpoint Name is equal to (=) GET /userinfo/json.
In the Vulnerabilities section, click on Vulnerability Attribute + and select the attribute according to your requirements. For example, Vulnerability Status is (IN) either Open or Under review.
In the Data Classification section, complete the following according to your requirements:
Click on Datatypes + and select the attributes according to your requirements. For example, Request & Response of the API endpoint contains either (Contains any of) the Credit Card PIN, username, and password data types.
Click on Datasets + and select the attributes according to your requirements. For example, Response of the API endpoint does not contain either (Contains any of) the Generic Personal Info or PII UK data sets.
Click on Data Sensitivity + and select the attributes according to your requirements. For example, the Request data of an API endpoint is highly (High) sensitive.
Click on Next.
Review the attributes and settings you configured above in the Review/Save step. If you want to make any changes to the settings, click on the Edit icon in the top right corner of the Criteria section or click on Back to navigate to the step where you want to make a change. Else, click on Submit.


The custom policy is visible under the Custom tab of the Compliance Policies page. You can perform the steps above to create multiple policies. You can Enable or Disable these policies on this page according to your requirements. To do so, click on the toggle under the STATUS column corresponding to the policy you want to enable or disable.

Note
Custom policies may take up to 24 hours to generate Issues post-creation.
You can also perform the following actions on the policies by clicking on the Ellipse (![]() ) icon corresponding to a policy:
) icon corresponding to a policy:

View a policy to identify the attributes that Traceable is using to identify violations.
Edit a policy to add or remove any attributes according to your requirements.
Clone and edit a policy to add or remove any attributes according to your requirements.
Delete a policy.
Note
A deleted policy cannot be restored.
Traceable also allows you to filter policies to view the ones you want:
Category — This lists the policies based on the category you assign to them during creation.
Severity — This lists the policies based on the severity you assign to them during creation.
Status — This lists the policies based on whether they are enabled or disabled.
Was this article helpful?